Showing posts with label hifi tips. Show all posts

The original common diode rectifier.

The Schottky diode, manufactured by Fairchild Semiconductors. My phono stage requires 8 pcs of these very chunky diodes.

It's been a while since I held the soldering gun. I've been a little lazy lately and my DIY parts bin and half completed projects have been pilling up. I suddenly had the mood to do something about it today!


The idea was to fit all those stuff listed below in to my Pass ONO clone DIYed phono stage:


1) Furutech Inlet G, a chassis mount IEC socket for the quality conscious.

Furutech IEC Inlet G(what else?), available from Audiomatic, cost RM$52.00 per pc.

2) Schottky diode rectifiers, something which I've always wanted to try, as the DIY world has plenty of stories how this little diode transforms the sound of the humble "modded" Marantz CD63, AD 815 JRDG clone pre amp amongst other stuffs.

Schottky diode, available from Farnell Newark, part no.955-6770, cost RM$2.19 per pc.

3) Refit a proper grounding post, I could not find it when I started building the phono stage 2 years ago, but I recently manged to acquire the proper grounding post.

Grounding post(green coloured), available from an electronics store in Puchong. Cost RM$4.20 per pc. My Rega doesn't require grounding, but I'd just like to have it.

The work to remove the old parts took out and replace the new ones took about an hour. After which, I tested the phono stage again for function and sound. With the item confirmed to be working and sounding as per normal, I proceeded to put back the cover(top plate) of the phono stage. It was then I also decided to torque set all the chassis external screws. I set the torque to 4kgs as per my other "original" Pass X2.5 pre amp torqued earlier.


The mounted Furutech IEC chasis mount socket.

After all the work, I sat down to play a few LPs. But the moment I switched "on" the system and let it settle down, I was stunned by the relatively silenced back ground of the phono stage. Previously, when I left the system to settle down, with the phono stage on, and the pre amp volume setting at 12(my usual listening volume), I could hear a faint hiss emanating from the speaker's tweeter. Now, this hiss is no more, and free from all other electrical noises. I proceed to play Tsai Ching's Lou Ge 2008 re-issued 180gsm LP, with the silenced back ground noise, I also noticed that there is no more sibilance in female vocals. The high frequencies are also tidier and cleaner then before. More low level resolution is revealed now.


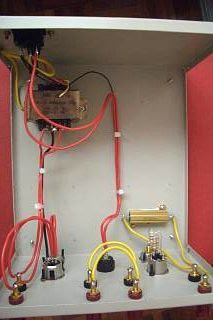
The innards of the Pass ONO clone DIYed phono stage, balance topology. All signal cabling(red/black) are vdH SCS18.

Is it the Furutech? or the Schottky making most of the sound improvement? I don't know, but what an excellent sonic up grade to spend almost RM$80 for parts cost and an hour's handy work.


Foot note: I did another Furutech IEC Inlet G install for a friend's CDP today(12/05/2009), but subjectively found it's contribution to the sound improvement, very minimal. Hence I can only speculate that in my case, most of the perceived sound improvements to be contributed by the Schottky diode high speed rectifiers. In the end I'll borrow my dear friend Ken's caveat again, YMMV!

Some would call this 'voodoo'. I admit that, with whatever little science I learned in school, I myself do not know of or read of a fully convincing explanation of this effect. But that is just me.

The 'theory' of system demagnetizing goes like this - the ferrous (magnetic) materials or impurities in our system can get magnetized after a long use. This magnetism could negatively affect signal flow. Running a 'special' signal through the system, from the frontend all the way to the loudspeaker, will demagnetize the system, i.e., randomize the polarity orientation of the magnetic materials. (Well, you can think of a few whys and hows on these statements, can't you?) :-)

Leaving the basis of its working aside, whether 'demagnetizing' works on our hifi or not polarizes audiophiles' opinion too. However, based on my many years of doing 'demagnetizing', I say it has an effect in my system.
The 'special' signal comes in a number of varieties apparently, I myself have 3 different versions on CDs. However there is also a hardware based version - the Gryphon Exorcist, it is the first product that I am aware of (in the early 90's I think) that offers system demagnetizing.

The content of my 3 different versions are different. On the Stereophile Test CD 3, it is simply a 1khz tone that fades to silence in 23sec; on the XLO & Reference Recordings Test & Burn-in CD, it is a frequency sweep, starting from the bass, progressing through the mid to the treble in a minute. The Densen DeMagic CD has only one track, which is 3 minutes long. The track contains bass, mid and treble components (but is not pink or white noise) which slowly fades, it also has a 'chirping' sound interspersed into the track.

I found the least effect with the XLO/Reference Recordings disc (but I do enjoy the music that comes with it, excellent recording quality from Reference Recordings).

I use the Stereophile disc the most, because it is the most convenient (short duration) and the least noisy. However, its effect can go 'overboard'. Sometimes after running the demagnetizing track, the system sounds a little too dark and slightly shut-in (the highs got curtailed quite a bit), but it will recover in 2-3 days.

It was the Stereophile disc that made me a convert. In my early hifi days, I used a pair of Nordost Flatline Gold speaker cables in my entry level set up. Over time, I found that the system sounded too sharp and too bright, very analytical, very uncomfortable to listen to. I blamed it on the Nordost, and switched to a pair of warmer sounding speaker cables. My system was more listenable but I lost quite a bit of details. When I found the Stereophile test CD, I gave the demagnetizing track a spin, and lo and behold, everything calmed down. Switching back to Nordost, I found that it was indeed the superior one - clearer, more transparent, faster. Since then, using the Stereophile disc became a routine for me.

I use the Densen disc occasionally. It is the longest and noisiest wait. Its effect is always positive though, but the magnitude of improvement varies with each run. I suppose this is dependent on the condition of the system at that time. If you can live with the noise and the time, it is the best among the three.

I think it is good to leave the room (or at least cover your ears) when running these tracks, so that they do not affect your 'hearing balance', if you want to do a comparison of before and after. :-)

So how do I know when I need to demagnetize my system? Usually, one two months or so after a previous run, I'd start to detect some roughness in the highs, the system could sound a little 'jittery' or noisier, there could be some glare or brightness. One would normally have the urge to want to tinker with the equipment and cables already at this point. I got to remind myself to hold the horses and run demagnetizing first at moments like this. :-)

What is the effect of demagnetizing in my system? It usually reduces those negative effects. The feeling after is like looking at a scenery after heavy rain - cleaner, clearer, and more vivid. The background is also quieter.

I can't detect any negative physical side effect on my system (it is not like the equipment will break down or drivers will blow), so even if we want to call it 'voodoo', there is no harm in trying it out. If it works for you, then that's great.

P.S., Isotek also has its version, but I have not tried it myself.

I am in a lull as far as hifi hardware is concerned, so I thought to share some small items that will help us get better sound.

Everybody will agree that it is a good practice to clean all the contacts in your system periodically. Once or twice a year, I'll disconnect all my interconnects, loudspeaker cables and powercords, and give their connectors a good wipe. I also clean up the input/output terminals on the cdp, amps and loudspeakers at the same time. Cleaned contacts give better sound, especially in details and smoothness.

In my early hifi days, being cash-strapped, the choice solution was some isopropyl alcohol and a few cotton buds, both available from local pharmacies.

Then I found Kontakt, whose product is much more effective. Kontakt 61 is my favourite, it cleans off the grunge and when dry leaves a thin film to protect and lubricate the connectors, which is especially useful if you swap cables frequently. The protective film also keeps the gold plated connectors looking new and shiny over time.

Give the connector a light squirt from the can, wait a minute or two, wipe the residual away with a cotton bud. You'll be surprised by the amount of grunge that comes off, even from connectors that look clean and new enough to the naked eye. Leave to dry for a couple of minutes, a thin protective film will form on the connectors' surface, oily to the touch.

The only caveat from Kontakt is that this thin protective film may impede low voltages (<1v). This might be a concern for vinyl frontends, so you have to experiment. In my own experience, listening only to CDs, I could not hear any adverse effect from my CD player all the way to the speakers. And this is definitely not a concern for powercords.

Check out Kontakt 61's specs at http://www.farnell.com/datasheets/318247.pdf.

If your connectors are old, tarnished or corroded, you need a stronger solution. Look for Kontakt 60 and Kontakt WL. Kontakt 60 is a cleaning agent that dissolves corrosion products, and WL is used to rinse them off for best result. Kontakt 61 can then be applied to protect the cleaned contacts.

For routine cleaning, I find Kontakt 61 alone is sufficient.

Kontakt products can be found in some hardware/electrical parts stores. In KL, I get them from Jalan Pasar at RM18-RM22 a piece.

I have not compared Kontakt with any other specialist cleaning solutions for hifi, such as DeoxIT. So if you have any such experience it will be interesting to share with us.

Happy cleaning.


Dear Lil'kc and Ken,

Thanks for the time you spent at my place the Sunday before last. I found it both interesting and educational when you demonstrated your approach, or probably more appropriately called your 'philosophy' to sound, in the span of 4 hours or so.

I have taken the last couple of weeks to get a better handle on the sound changes in my system from the 'torquing' you have done on my equipment. I have also been thinking through this experience. I like to share with you my understanding, and please give me your feedback, especially if I have missed out something or have not been correct.

I understand that you aim for a number of key sound characteristics. I identified these as openness & clarity, extended frequency response at both ends, dynamism, and liveliness. This seems to be taken as an 'absolute' reference. I got this when on a couple of occasions lil'kc mentioned about his 'C', which is what he used to call his sound quality target. He used 'C' in contrast with 'A-B', that is that you are not evaluating sound quality through relative comparison (i.e., A-B'ing equipment's performance) but against a fixed standard instead. Am I right? (lil'kc talked about 'C' quite regularly on his blog, I could not understand it till now!) :-)

Since you have this clear target, everything done is aimed directly at its achievement. This was demonstrated in your visit session. The tightening of the screws on the equipment using a torque driver seems to 'liberate' the sound (well, 'tightening' is a misnomer, in fact, the torqued screws are looser than the original tightness that the equipment came with, but now every screw has the same tightness). As the 'torquing' exercise moved upstream, first the loudspeakers, then the amp, then the cdp, openness and dynamism of the sound improved. Then, step by step, a Telos powercord was added to the cdp, existing tweaks were taken off one by one, and tweaks from Telos were added, such as XLR caps, RCA caps and the loudspeakers banana caps. At each step, listening is conducted and the step will be reversed if the change was deemed to have gone overboard from the sound target.

Telos XLR male caps. Female version also available

Slowly but surely, the sound quality edged towards those sound targets mentioned earlier. The volume control edged up too, music was played louder and louder, adding greater dynamics, clarity and excitement to the listening experience.

Honestly, I have never listened to music on my system at such loudness level. Usually I would have found it a little painful aurally at levels like this, but now, the sound was composed and smooth.

The character, dynamic swing and the volume of the sound reminded me a lot about 'Live Sound'. I think I am not wrong to say that your 'C' is actually about that - LIVE.
Telos RCA caps

Swapping tweaks with those from Telos showed that they are pulling in different directions. My existing tweaks seems to work by 'covering up flaws', such as improving smoothness by turn down slightly the upper mids and the highs. However, Telos' pulled the other way, they aim to take the sound already liberated by torquing and expand it even further.

Am I right to say that torquing is the pre-requisite for the use of Telos' tweaks? I could imagine that without torquing, the addition of Telos' caps would not have given the users the full benefits, if at all. If so, then Telos dealers must educate their customers accordingly and probably even perform such a service for them.

Telos' products also seem to give the max effect when they are used as a total solution, as was heard as more and more Telos products were added. Mixing it with other brands again may restrict their full potential. So I think prospective users should be ready to go the whole length eventually.

Telos banana caps for speaker terminals

Ken has been advocating that all tweaks should be re-evaluated after torquing, he is right. I like to bring this one step further - every time a change is made in your system (e.g., adding a new piece of equipment), all tweaks should in fact be re-evaluated. Because if the tweaks do the 'cover-up flaws' thing, as I understand that some do from this experience, and the new change takes away the flaw, leaving the tweak in actually would restrict your system's performance. Not sure if you agree with this tweak novice. :-)

Anyway, I am interested to check out further the efficacy of Telos' tweaks, starting with the caps, as they aren't really expensive. I really must go and get some review samples. :-)

After you left and took away with you all the Telos items, I listened to my system for a few more days. The effects from the torquing were still there, but the performance was different from that during your visit session. I now look forward to do a longer term evaluation of Telos' products.

As it is, the system still sounds pretty good, with just the torquing effects left - 'Live-like', not your full 'C', but a few steps closer. :-)

Yours,
Hifikaki

Ken's question about PDL vs Clipsal vs MK under "bryston replied on torus receptacle issue" prompted me to think about my own experience, I'd like to share with you a good and inexpensive UK type wall socket.

I do not like, for hifi use, the wall sockets that are common place here - the white plastic cover type that has an on/off switch, like the ones shown above.


Picture from RS Malaysia's website

I found this MK socket with a metal face and a very sturdy build, the metal parts at the back are chunkier and looks high quality. Best thing is that it is unswitched. If you look at the construction of the switch in a socket, you'd notice that the contact area is a small point, which increases resistance and thus impedes high current flow. Though taking away the switch means that you have to suffer some inconvenience if you are used to swithcing things off at the wall.

(Note though, that switching things off at the wall does not guarantee complete protection from power surge. The only 100% sure protection is to unplug everything from the wall in case of a thunder storm.)

Indeed this MK unswitched socket gives better performance compared to the white plastic type, music has better flow, becomes slightly more robust, and has fewer rough edges.

I could not find it in the normal hardware store. I found it on RS Malaysia's website (http://malaysia.rs-online.com/web/), search for "MK metalclad plus", and under "wall socket" you'll find the item number 246-9366.

If you do not want to spring for an audiophile-branded wall socket, this is a very fine upgrade from the normal stuff for an investment of less than RM50 for the one gang version.

Disclaimer: I assume no responsibility for any mishap, please hire a qualified electrician if you want to change your wall socket.

The Furutech FI-32(G) vs Hubbell


Yeah, it's being 2 emotionally devastating days since the departure of the Torus Power, though I am not feeling or listening mood is not holding up too well for now, my final order for a Furutech FI-32(G) finally arrived, giving me an opportunity to detour from the prevailing hifi moodiness. This was meant to be used to replace my existing Hubbell IEC 20A plug(installed in to the output end of my JPS Inwall power cord) for plugging in to the Isotek Sigmas from wall socket. So you can call this a comparison between Furutech and Hubbell.

The FI-32(G) is about 3 times the price of the humble but still good quality Hubbell. Can we expect 300% improvement? At this level of world of high end audio, the law of diminishing returns certainly bites hard. But still, I can say that you can still easily expect 10-20% improvement(again system and dependent, so the YMMV caveat still applies here!), if I am still hearing correctly.

The main improvement area to the resulting sound is probably the highs. The highs now have further refinement compared to pre Furutech installed. The overall presentation of the sonic picture is also a little tidier and cleaner. The bass lines a just a tad firmer and more well controlled.

In terms of termination ergonomics, both the Hubbell and Furutech are equally easy to work with. However, the FI-32(G) is more comfortable with accepting big fat power cords like the JPS Inwall. The finishing aspect sees the Furutech leading with more polished gold surfaces while the Hubbell makes do with industrial grade materials. Still at 1/3 the price, the Hubbell is not too shabby either.

However, if it's absolute sound quality and refinement that you crave for, then only the pricier Furutech will do. I know that I've over crowed about the Furutechs a little too much by now, and should leave things as they are for now.

Furutech is sold by,
Center Circle Audio, tel: 03-77282686
Audiomatic, tel: 012-3222698
Dong Fong Ipoh, Tel: 05-5477863


Referring to my earlier posting titled X-2 Capacitor Filter Tweak, dated 15th November 2008. Now that a few of my friends have tried it and have updated me with some feedback that might be use full should you wish to try.

When I did my tweak, I used 0.1uf rated 275V capacitor to short the "live" and "neutral" at the IEC plug end of my power cord. Some of my friends followed the tweak with the same value cap but reported no differences or perceived improvements in term of power line noise reduction. I have since asked them to try other values available.

You may purchase any of these X-2 capacitor values available at the electronics spares supply shop:

0.1uf @ 275V

0.22uf @ 275V

0.33uf @ 275V

0.47uf @ 275V

1.0uf @ 275V

2.2uf @ 275V

The suitable X-2 cap value to use as a filter tweak really depends on the power supply quality in your area. My area, near USJ Subang isn't too bad and I got very positive results using 0.1uf caps. Another friend who lives in Bandar Utama, near hifikaki and ML's place, reported no improvement when he first tried using 0.1uf caps. He later found that 0.47uf cap value gave him very good results.

Another fella in Kuantan reported he only found improvements after going all the way up to using 2.2uf cap value. I have being to his place a couple of times over the years and can testify that the power supply quality in Kuantan is pretty bad indeed, plus it comes with frequent black outs and brown outs(according to my long suffering friend whom almost gave up hifi because of power supply issues). I feel for him, as I feel for ML.

As usual, I will apply the caveat of non-liability should you suffer from damaged equipment, injuries or electrical shock, or worst death, as a result of this DIY activity, which invariably involves high voltages which is dangerous.

Also note that "your mileage may varies" in terms of results from this tweak.

Good luck.


lately, i have been labeled by my hifi friends as the hifi madman, simply because of my intention to move house.

weeks of bad AC problems have rendered my system unplayable, even after 2am in the morning when everyone should be soundly asleep, it doesn't sound good. plagued with such misery, i have thought of biting the bullet and moving out from this area altogether. i don't think i am insane but many of my hifi friends do think so, except wong tatt yew, my dealer friend, who empathizes with me as he had been thru this path at the peak of his hifi fever. one even "scolded" me for such ludicrous idea. he said, "there is more to life than hifi".

this miserable episode has given me much audiophilia nervosa. i begin to enter the gate of audio hell where my only obsession is to gauge whether the AC quality is good for playing. i play the same old few tracks repeatedly, day in day out, night in night out, to gauge the sound. i lose my music. i suffer silently. no one understands me.

then one bright idea came this morning at 3am. it suddenly dawned on me that i have using the red-colored phase (of my 3-phase) for more than 2 years now. it used to be the most stable (with minimal voltage fluctuations throughout the day) and best-sounding, could it be that it has been overloaded or redistributed by TNB (our national power company)? without hesitation, i sms-ed my electrician at 3am and summoned him to come in the morning.

it took my audiophile-trained electrician less than 5 minutes to change the red-colored phase to yellow-colored phase (the remaining one is blue-colored) and i immediately switched on my system.... lo and behold, it comes alive! that is the true sound of my system! i jumped up in elation and punched my fist in the air! yeah! yeah! yeah! that's the way i like it! (a-hak, a-hak)

the recent furutech IEC plug upgrade, the new meridian g08.2, the new hydra 8 (read later part of this post) all combined to push the previous sound boundary to another level. it is my all-time-best sound i have ever attained. another milestone. marvelous!

the moral of the story is - one must think out-of-the-box in solving critical hifi problems. i have been so obsessed with other issues that i lost sight of the fundamental suspect. it would have saved me so much pain and agony had i realized this simple trouble-shooting skill. i just documented this tip into my hifi trouble-shooting checklist, which i refer to from time to time.

i would urge all users who have 3-phase electricity in their house to periodically listen to each phase and pick the best phase for their hifi. one could never understand how TNB loads and re-distributes each phase from time to time. ultimately, use your ears as the judge. please ask a qualified electrician to do the switching for you.

i am smiling again, so happy that i have gotten back my sound, after 3 months of suffering.


[hydra demystified]

i loaned master ken my shunyata hydra 4 last week. while he was sufficiently enamored, he commented that the hydra's main drawback of slightly duller highs (as compared to his RGPC) prevented him to consider further, and he is not willing to "tweak" it like i did.

readers here should know how much i and hifikaki adore the hydra. to maximize hydra's potential, one has to use good interconnects (silver preferred) to compensate for the highs, which is hydra's only weak point. hydra's seductiveness in the midrange, immense musicality and superb naturalness eand how it retains the full tonal colors of the original sound are what kept both of us enchanted for so long. so far, no PLC can come close in these critical areas.

recently, in tiny dot singapore, i observed many hydras being sold in echoloft. many have converted to acoustic revive apparently. it will be interesting if i can get hold of an acoustic revive PLC and do a shoot-out. i will check with happy audio visual. i will leave my dissection on PLCs for another day but watch out or a PLC "party" coming soon!

i got hold of a hydra 6 from a friend, doubting that it can be any different from hydra 4. voila!, it is actually much better than the 4! there are more details, more energy, a bigger soundstage and even lower noise floor. hifikaki explained that because the 6 uses 3 duplexes (which has a filter on its own) as compared to 4's 2 duplexes only. in fact, he think hydra 8 is even better because i has 4 duplexes!

without hesitation and as a reward for myself for solving the AC problems - at least for now - i upgraded my hydra 4 to hydra 8. this must be the quickest buying decision i have ever made!

the hydra 8 is superbly large-scale, weightier and more expansive and dynamic than either the hydra 6 or hydra 4. it is a worthwhile investment again.

i think it is time to savor my music without getting anal and mental.

this is the uncanny madman signing off with a evil grin - yes, i am mad but i am true to my hifi and my music!

for someone who has little patience, i have been experimenting patiently with the FE ceraballs for the past 3 days.

i am amazed as i dwelve deeper into them. maybe i am a tweak virgin, pardon me.

first things first - the ceraballs must be used in 4 pieces to derive the full benefits, not 3 as stated by my fellow bloggers here. when 3 pieces are used, the full (positive) impact of the ceraball is largely compromised.

it is darn difficult to balance your equipment on 4 pieces; there is bound to be one single piece which is "loose" and not in tight contact with your equipment's base. when this happens, the resultant sound is again hugely compromised!

here's the trick i found out: balance the two pieces (back or front, depending on whether your equipment is front-heavy or back-heavy) using two hands simultaneously. move the two ceraballs in opposite or random directions until such point where the tips of ceraballs are into tight contact with the equipment's base. when you reach this point, you normally cannot move the ceraball anymore. stop there!

also, as astutely observed by ck gnoh in his comment in "the power of titan" post, the positioning of the ceraballs is critical. it requires minute adjust! it is really a tricky balancing act as you move the ceraballs wider or closer apart, forward or backward. the moment you get the best highs, you get less focus; the better the focus is, the less highs. you have to experiment until you get the best bass and best stereo imaging and the least compromised highs. as i have said, these are the pluses and minuses of the ceraballs.

after many trials, i managed to somehow maximize the ceraball's positive impact and minimize its negative impact. my highs are (arbitrarily) 3-5% less than what i used to get but i gained more in terms of imaging, focus and soundstaging. could the 3-5% loss be considered as excess highs/energies? i need to mull over this in the next few days.

there is still much to experiment with these balls of fire but this tweak virgin is definitely having fun!


When planing to enter the world of high end audio, what do you think of first? The budget of course!, nothing matters without budgets. So now you're prepared to spend the $$$, what do you have to think about first?

Many newbies whom I posed this question to answered with which gear to buy! Some even think to the extent of which cable they wanna buy. Not one person thought about where are they going to set up the system, once purchased.

Now, this is the most important factor of them all! Before anyone even think about buying any piece of audio equipment with the aim of achieving realistic high end sound, think about where you'll likely want to set up your system, because you're likely going to spend many hours of your waking time, in the place with the aim of enjoying music.

Be it in a dedicated room, or in an open area of the house, like the lounge or hall area, be sure the environment is quiet, and reasonably conducive for music enjoyment. Once the area is identified, think if you wanna pull a dedicated power supply line to the said room or lounge?, however that could be fixed at a later date, sometime after you've set up the system.

The room or space where the audio system is to be set up will very likely influence the final sound you'll hear thru the speakers, due to a factor called speaker/room interaction. The speaker cones acts like a moving piston in the room thereby, exciting room modes. There's an exact science where the dimensions of the room will indicate the room mode frequencies. But let's just take it easy for now an leave the science to the pros. Look at the link here, taken from http://www.audiophysic.de/technik/index_e.html , look thru the spec sheet, and you'll see from the 4th row down to the left of the speakers line up technical spec, noted as , "Require Space" and you'll see that it clearly indicates the minimum room sizes suitable for each model. From my experience with Audio Physic products, your room size can be slightly exceed or reduced, use the chart as a guide. You may even find that some room sizes able accommodate 2 or 3 models, in that case, an in room demo would be required, and your ears will determine the final choice. More speaker companies should provide this crucial information, which in my opinion makes speaker buying so much easier.

Good, now that you have your room, and speaker choice, based on the speaker specs, again looking at the technical chart provided by Audio Physic for is various models, you can then shortlist a few amplifier models, that will in theory be mode than adequately power your pair of speakers. Amps should in theory be a "wire with gain" and nothing more. It's job is to take a low level signal, amplify the signal with minimum of distortion added or signal corruption. Ideally it should also be very transparent in sound, and not lose information along the way.

Finally, you can work towards your choice of source, be it digital files streaming system, CDP or Turntable. A source's job is to extract the maximum information out of it's carrier. The source may even be slightly tonally coloured, if you're in to that sort of a thing.

Finally, you can look into your choice of auxiliary equipments, like cables, power conditioners and equipment racks. If you followed the speaker to room size ratio as per advised by Audio Physic(if you're in to Audio Physic stuff like me), you should require very little room treatment. But in the quest for perfection, some room treatment can enhance the whole listening experience.

Once all the above has taken place, you can then look at tweaks, if that's your kinda thing. It can be some crystal bits on top of speaker's corner, or sound tuning beak, as Totem speakers calls them, Shun Mook, cable evalators, like Shunyata Dark Field, you get the idea. Non essential items that do help to squeeze the last ounce of performance from your system if implemented effectively.

I don't know how true this is, but my personal experience tells me this is a better way. More experienced sifus may have other ideas, perhaps?


The outside, nothing has been changed.


Many thanks to GCK and a few others whom pointed out some missing elements in my home brew Kable Kooker. Chief amongst those is the variable frequency sine sweep function, which unfortunately, came to a point where a DIYer like me has to call it a day. After all, certain things are just beyond my grasp and abilities.

The inside, note the white 5W rated loading resistors.


I went to the Audio Dharma website, where there's plenty of information on how the real thing worked. It than dawned on me that I had made two mistakes in my earlier attempt. The mistake was that I had used the standard XLR/RCA cable spec impedance to load the cables as it cooks. As per explained clearly by Alan Krafton on the Audio Dharma website, I should 've used a power amp's load to cook the XLR/RCA interconnects instead. A quick consult on my Pass Aleph 0 manual indicates the amp's load to be 25k ohms for XLR and 10k ohms for RCA. Further consultation with my senior DIYer sifu tells me that some tube power amps can present loads as much as 47k ohms for XLR and 20k ohms for RCA interconnects. Just to be sure, I used the bigger values for a more effective cook.

Another view of all the loading resistors for XLR, RCA and speaker cable cooking. The top 2 resistors for XLR loading value 47k ohms @ 5W.


As my previous load resistors for the XLR and RCA are rated 2W, I've found them to run moderately warm when cable cooking. To increase reliability and lifespan, I used 5W rated resistors this time. Similarly, my home brew kable kooker also measured up to 1.86 amperes when cooking speaker cables, against the original measuring 1.88 amperes. That means I was right on the $$$ where speaker cable cooking is concern.

The RCA(at bottom) load resistor value 20k ohms @5W.

Just to try, for my self, I re-cooked my AQ Sky and Colorado XLR interconnects again, and found the results of the cooked cable much more sonically satisfying at shorten cooking time. To get the same level of results, I used to have to cook about 96 hours, or 4 days. Now I can do so with the same great results in 24 hours!

Now that's what I mean efficient cooking!

Once again, thanks for sharing your "desirable thoughts" with me. I've learnt so much from your kind responses.


[In-Line Advertisements]

The front of the kable kooker, note output sockets on the left, input sockets on the right. Speaker cables should be connected from left to center left, center right to right to form an electrical loop.

Here it is! My DIY version of a kable kooker.


First a declaration before I proceed with this article. I have never seen the actual Audio Dharma Cable Cooker before embarking on this project. I have, however seen some pictures available here on this blog and else where on the www.


The rear panel with IEC and fuse holder.

I just made an educated guess that it will sort of work this way, and along the way have the guiding hand of a senior DIYer. From the photos and pictures I've seen, the commercially available cable cooker works by supplying 12V A/C to the cables and applying the appropriate resistance to each intended cable to simulate the necessary load, like 8.2 ohms @ 50W for speakers cables, 75 ohms @ 2W for RCA and 100 ohms @ 2W for XLR interconnects.


The transfomer, note ratings.

To start with a 6V 0 6V @ 3 amps rated transformer is used to step down from our 240V wall supply via an IEC socket and ON/OFF switch with indicator, fused with 0.5 amp 30mm fuse, for safety purposes. From the step down voltage of 6V 0 6V, power is parallel supplied to the out put speaker connectors, RCA and XLR connectors. On the receiving end of connectors, are resistors attached, to simulate load on the cables when connected to form an electrical loop. See connection picture for a better idea.


The internals, note the load resistors on the right side.

Like the commercially available unit in use, the DIY kable kooker will need some adaptors to work. It will need a female - female RCA connector to cook a pair of RCA simultaneously. It will also need a speaker(spade/banana) connector - wall plug converter and an IEC - speaker(spade/banana) connector for cooking power cords, which I have yet to build, but can easily do so should the need arises.


Another look at the connections, from the back. Note that everything is reversed!

For XLR interconnect cooking, just connect the pair of XLR's output to input before routing them back to the kable kooker to form an electrical loop.


Kable Kooker in action, top is back panel, bottom is front panel. Abbey Road speaker cables and AQ Sky XLR cooked in pairs simultaneously.

It was a fun and easy project for me as it took about 2 hours to finalise component list, circuit and layout. Half a day at Jalan Pasar(Kuala Lumpur's electronics supply area) to pick up the parts and another one day to drill the necessary holes, fit all the plugs, sockets and connectors plus finally, wiring it all up.


Another cooking view from front panel.

The kable kooker project was born out of the necessity to cook the Abbey Road speaker cables reviewed earlier. Whilst at it, I also took the opportunity to cook my AQ Sky XLR pair of interconnect. I can in fact use the kable kooker to cook all 3 types of cables in pairs at one go! that's how versatile it is. Like the Audio Dharma unit, the DIY kable kooker runs rather warm when doing it's job. The RCA and XLR sockets should also run a little warm when cables are inserted for cooking.


I do not have the chance to A/B it's effectiveness against the "Real McCoy" but my own subjective post cooked cable experiences echoes those of the Audio Dharma users reported here earlier.


The usual DIY caveat applies should you decide to build one for yourself. I cannot be held responsible for any loss, damage equipment, shock hazard, injuries or death as a result of negligence from following my posting here. Please DIY at your own risk.


[In-Line Advertisements]