Showing posts with label amazing tweaks. Show all posts

The Elit Acoustic MSI packaging, including the cable elevator's.

Taiwan has been on a hifi roll call lately. First up was the excellent tweaks and cable products from Telos, which are already too well featured here. Now come Elite Acoustic, hot on the heels of Telos, with their range of levitation devices, quite similar to those German made Clear audio Magix. The Elite Acoustic MSI are patented(though it doesn't say which country) and Taiwan made. Finishing is rather good, but the method of implementation of the opposing magnets are clearly not as free floating as the Clear audio's equivalent product.

As per our earlier feature in which the Elite Acoustic MSI cable lift(elevator) challenged the universally proven Shunyata Darkfield, it is now the turn of the MSI for hifi equipment.

There are 3 MSI models available depending on weight of equipment range. The range are listed below for your reference:
MSI-250 load range 0.5 - 2.5kg each, price RM$189/pc
MSI-500 load range 1 - 5kg each, price RM$289/pc
MSI-1000 load range 3 - 10kg each, price RM$310/pc

However, Chan of Sound Precision advocates trial and error in setting up the MSI with the equipment to support, and finally finishing up by ensuring a level levitation. For me this is done by placing my Audio Physic spirit level in the center of the supported equipment.

Final set up is to ensure a level equipment levitation.

Once leveled, we're ready to roll with the sound. I must say that inserting the light weight MSI-250 below my Rega P25 turn table made it less venerable to knocks on the supporting shelf. The "thud" feedback sound as I knocked the shelf supporting the turn table became less obvious. However the sound took on a slightly strident note, with a slight highlighting of the high mids, which with certain Chinese recorded LP, became some what irritating. It totally turned me off from playing with the Rega P25. To be fair, my analog rig is far from optimally set up and should not be used as a reference of any kind, but I was just wondering what the MSI would do for the Rega?

The Rega P25 turn table levitated.

Next up I placed 3 pcs of medium MSI-500 below the Bryston BCD-1(follow up review to come) and surprisingly elevated up the already business like sound by another notch or two. I found that with the MSI supporting the Bryston CD player, the sound became more free flowing, more musical and adds a little more spatial and dimensional sense to the sound stage.

The Bryston BCD-1 levitated too!

I then further added 3 more pcs of Elite Acoustic MSI-250 below the Bryston BP-26 audio box and the power supply box in the rack below, i.e. I used 6 small pcs of MSI-250 in total for the pre amp and power supply box. I find the mids now take on a certain bloom, that seems to remind me of my Pass Labs and Marantz combo sonic signature. Female vocals can now sound sultry, and less academic when singing. I am beginning to like what the MSI is doing to the Bryston combo.


The Bryston BP-26 getting the same treatment on both the audio and power supply box.

Lastly, I used 4 pcs large MSI-1000 for levitating the Bryston 4BSST2. When I turn on some orchestral music, like the CD tittled "For Sentimental Reasons", by Linda Ronstadt featuring Nelson Riddle and his orchestra, I was gobsmacked!!! The sound stage now have depth of field, and the layering of the orchestra members within the sound stage was easily perceived. Each instrument within the sound stage had it's own space, rather than bunched up together, seemingly elbowing each other. The solid state like dryness noticed earlier is now gone too, replaced with what feels like morning dew rich fresh air!

The Bryston 4BSST2 also floated.

With the whole Bryston system levitated with Elite Acoustic MSI, the performance transformation was quite startling indeed. It's as if the already fine sounding Bryston system was suddenly punching well above it's weight, not to mention price range too, very nearly approaching those sonic references set by the Bladelius and Marantz combo I experienced last month.

A closer look at the Elite Acoustic MSI-1000 doing it's job.

Now, if you're thinking about getting Bryston gear make sure you get the Elite Acoustic MSI to go with them. They are a sonic match made in heaven! As for other gears compatibility, my usual caveat stands, try before you buy!

And yeah! I am still living with the Brsytons, so no chance to try the Elite Acoustic MSI with my usual set of gears just yet.

Elite Acoustic is sold by Sound Precision, contact Mr Chan, tel: 019-3825937

Elite Acoustic MSI on the left, and Shunyata Darkfield on the right. Let the games begin!

Until the arrival of the Shunyata Darkfield, I was a cable elevator skeptic. However, with Shunyata in the game for cable elevators, being company whose products are non voodoo science by nature(well at least their "white paper" theories seemed plausible), I figured they must be up to something good. And since I had one product on hand, which coincidentally Sound Precision brought about their latest product, Elite Acoustic MSI, amongst which include a cable elevator.

Since Hifikaki already post earlier about the Shunyata Darkfield in detail, I'll do a little explaining on the Elite Acoustic MSI(Magnetic Shock Isolator). It's elevated by means of two opposing magnets of the same polarity facing each other, not unlike the Clear audio Magix 2 reviewed on 4th March 2009. I must confess that however, the Clear audio Magix 2 is more well thought out in execution and better built. Another area of concern is the Elite Acoustic MSI is non-shielded, which means if you put 2 of the cables elevators close to each other, they'll wanna stick together! Does that also means another possible source of stray magnetic interference?

However I am happy to report that none of those concerns affected the subjective sonic reproduction out come as far as my ears are concerned. So are we ready to start the cable elevator shoot out?

Shunyata Darkfield, lifting Cardas Golden Presence interconnect.

First up, I'll mostly concur to Hifikaki's observation about the sonic observation of the Shunyata Darkfield. I found that placing the Darkfield under speaker cables to give most gentle of intrusions, meaning, it's sonic effect on speaker cables are most minimal compared to, say the power cords and interconnects, in the order of severity. I also found that you can't use too many pieces of Darkfield in your system either! I started with 4 pcs under my Straight wire Maestro II speaker cable, which made the back ground very silent, dark and brought about a new level of imaging focus to the overall sonic picture. I later added one piece at a time, to various power cords and interconnects, as I had a box to play with. With each piece added, the sound was getting darker, and the imaging focus seemed sharper in contrast. It was until the 9th piece, when I noticed the sound coming from the system took on a certain hardness in the high mids. At this point the whole sound stage also took on a rather constricted quality, like as if all the instruments are tied up with strings, just as in a puppet staged musical event. That, I did not like.

I also noticed that during it's time with me, some cables, like the Siltech G5 LS88 Classic speaker cable, did not respond well to the Darkfield. With only 4 pcs of Darkfield supporting both the left and right chanel speaker cables, the sound was already edgy and bright. I just couldn't wait to take the Dark field off! In the end, I found with just 3 pcs under my Cardas Golden Presence interconnect(4 meter in length connecting my pre to power amps) and a piece of Darkfield supporting my JPS Inwall power cord connecting from the Torus Power to my power amps, the sound was most well balanced between the background silence, darkness, and imaging focus.

Elite Acoustic MSI(Magnetic Shock Isolator) supporting the same Cardas Golden Presence interconnect.

Next, I replaced the Shunyata Darkfield with the Elite Acoustic MSI. Just like the I discovered earlier with the Darkfield, you can't use too many of these stuff. I also found the MSI to be weight sensitive, the heavier the cable the more effective it is. To achieve this, one can use less MSIs on a given cable length, that means like if I had use 4 pcs Darkfield earlier, I can now use only 3 pcs of MSIs to support the same cable. Once you dialed in the correct amount of MSIs to use on each cable, now you're rolling.

As per my experience with the Darkfield, 3 pcs of MSIs under the same Cardas Golden Presence interconnect gave excellent results. The MSIs never darkened the back ground like the Darkfields did. Instead, it fills the back ground with audiophile air, if a little hazy translucent like quality(I am trying my best to describe the sonic effect heard in lay man's term, hopefully it makes sense to you as an audiophile). Whatever it is, it's not white noise either. With the MSI, I feel the vocals and voices are projected with more density. This makes voices sound more complete and real, with chest and lungs. However, as you add more and more pcs of MSI, you'd find that the vocal imaging projected a little further and further forward in to the room, making the voice a little detached from the musical instruments in the back ground! I also subjectively found the MSIs more PRAT friendly to the tempo of the music, comparatively to the Darkfield.

In summary, the two cable elevators work in different sonic directions. I would say if your system is looking for a little more back ground silence, better imaging focus, the Darkfield is the more suitable candidate. Should your system crave for a little more audiophile "air" and dimensionality, with increased vocal density projection, then the MSI is a treat. At RM$100/pc, the Shunyata Darkfield is no doubt, the better value option. However, if it clicks with your system, as it did with mine, at RM$256/pc the Elite Acoustic MSI is my preferred cable elevator device, in the context of my system and musical preference.

In the end, your system and musical preference will ultimately sway your purchase decision. Like all tweaks of this nature, try before you buy is the order of the day.


Shunyata is sold by Valve & Vinyl, contact Mr Ng, tel:016-3302049

Elite Acoustic is sold by Sound Precision, contact Mr Chan, tel:019-3825937

The curiosity is killing me! What's in tha box?

Since I have moved on to the Bryston pre and power amps, I have found them to be more responsive to the Quantum Physics Noise Disruptor(QPND for short) tweak. Also based on Mike's advice about the better placement possibilities on the Torus Power, I agreed to do a follow up on this very subjective tweak.

The IEC poistion on Torus Power as recomended by Mike!

I'll start with placing on the Torus Power, this time, I put the QPND on the top of the IEC input, instead of in the center of the doughnut tranny. This position, as recommended by Mike, seems to make the noise floor(what ever's left of it!) subjectively lower, if just a little. Nothing much had changed to other areas of sonic performance.

The Bryston swings with the Audio Magic QPND too!

I then proceeded to try placing the QPND on top of the Bryston 4BSST2's doughnut tranny, which is clearly visible through the ventilation slots on the top plate. It is in this position, this took on a slightly more notice able difference. Sibilant sounding recordings were less an ear full, the QPND in this position reduced most of the vocal sibilant by a fair bit on Shirley's Red CD(an ABC International release). However, I must stressed that the QPND did not completely remove the sometimes sonically irritating artifact. The overall musical presentation became more coherent and the kick drums seemingly have better definition than before, contributing to a steadier flow of musical rhythm and pace. I also found the bass lines easier to follow.


Again, I must stress that in my rather flip-flop experience of the QPND, the sonic differences noted were very subtle. But I admit to have more limited audiophile ear's capabilities than most, and in this case I am no better for it. Again, in tweaks of this nature, my advise is to try before you buy.


Audio Magic is sold by Audio Creations, contact Mike, tel: 012-3315669

Audio Magic Pulse Gen ZX.

The Pulse Gen ZX as shown, meant to be installed inside your audio equipment.

I picked up 2 of this plastic little box, very light weight have a few holes drilled out around the sides and two wires, coloured black and green sticking out. I asked Mike about the cost of each, he quoted RM$1,500 each plus RM$100 if you want Audio Creations to install it for you. Other wise, you may opt to save yourself a hundred little ones to DIY install yourself, which is a perfectly simple option, if you're used to holding the soldering iron like me. A word of caution though, installing the Pulse Gen ZX voids your equipment warranty. So if you have recently purchased equipment, do spare a thought on the matter.


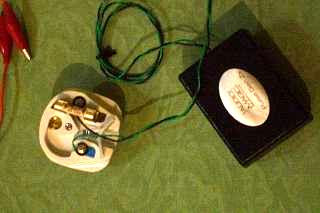
The Pulse Gen ZX is meant to be installed in to your equipment's IEC power cord input, on the inside of the box. That usually means opening the top cover and accessing to the IEC terminal from the inside of the box. The black wire from the Pulse Gen ZX is to be soldered on to the "Live" pin and the green wire is for the "Neutral" pin. Be very careful not to mix it up as the Pulse Gen ZX doesn't work, if soldered in reverse. The Pulse Gen ZX only works as per specified polarity connection. A sticky velcro is provided for you to mount the unit anywhere suitable inside your equipment's box.

You can also hook up to a plug top and use it for anywhere in your system's power supply. You're encouraged to be cretive in placing anywhere and using as many as you wish!

You may also hook up the Pulse Gen ZX to a plug top, like I did in this case a BS rated 13amp plug. Wiring instructions are exactly the same as above. This is actually the easiest way to enjoy the Pulse Gen ZX. Now if you can't even wire up a plug top, I suggest you get Mike to do it for you safely! You can then mix and match the Pulse Gen ZX in any variety of location(i.e., from PLCs, any unused wall socket on the same line with your hifi, and any unused distributor sockets) with multiples, and try till you get the best sound! The manual warns of a certain "addictive effect", as you add more and more units of Pulse Gen ZX. As I only have 2 units, my addiction is very much limited!

A closer look at the polarity, black wire for "Live" and green wire for "Neutral".

What's inside the little black box? you ask. From my limited measuring abilities using a multimeter, indicates the presence of a diode or two, resistors and capacitors. It's very likely to include a small regulation chip of some sort, as the unit gets pretty hot when functioning, prove of active circuitry at work inside the lill' black box. If after 10 minutes or so of plugging unit in to power supply or IEC socket, and unit stays cool, means you've got the polarity connection wrong!

Marantz CD7 outboard, temporary install.

First, I tried wiring a Pulse Gen ZX to my Marantz CD7 player. For this case, as it was meant to be a temporary installation, I used crocodile clips to hook up the IEC instead of opening up the who player. I made sure I did not "short" the "Live" and the "Neutral" pin together, other wise there would be no review possible! As I fired up the CD player, everything worked as per normal, then I load up a disc to play some music. The first thing I noticed was a quieter back ground and lower noise floor. The highs have a little bit more "air" and the mids have room to bloom a little more than usual, and the bass seemed to went a notch lower too. When playing vocal music the voice seems to have more density to the body. So far so good.

Crocodile clips "temp" install at CD player IEC terminal.

I then removed the Pulse Gen ZX from my CD player and used them to tweak my Torus Power RM8A and Wireworld Electrifier distributor block. I plug one Pulse Gen ZX on to an unused outlet at the Torus Power RM8A, listen for a short while, not really impressive, but you could more or less sense the same as described improvements as in the case of the CD player, if only to a lesser degree. I then add the second Pulse Gen ZX in to an unused outlet at the Wireworld Electrifier and felt like the result was better than before.


I tried another configuration, which is to leave the Pulse Gen ZX in the Wireworld Electrifier, un hook the distributor block from the Torus Power and plug it straight from wall, meaning all my sources and pre amps are now essentially only filtered by the Pulse Gen ZX. The results were again similar to above. But then I took out the final remaining Pulse Gen ZX from the Wireworld distributor, meaning there's now no power filter what so ever for my source and pre amps. The sound took a turn for the worse. Noise was clearly audible from the speaker tweeters(a high frequency hiss), vocals, now took on a rather sibilant high note and the density observed earlier is no more! This proves the Pulse Gen ZX really does work very well on it's own.


I then re-plug the Pulse Gen ZX in to the Wireworld distributor and added the other remaining Pulse Gen ZX in to an unused wall plug, however the Torus Power is still off line at this point, ahh..... musical bliss again. Based on my experience with the Pulse Gen ZX in the context of my system, it certainly works best when hooked up directly inside the hifi equipment. And should you not already splurged on a dedicated power line conditioner like I have, I am sure that you'll find the Pulse Gen ZX to provide your system with a very high performance lift!


With a PLC already in the system, I believe the results from the Pulse Gen ZX would be diminished, due to the PLC already doing it's work. Adding the Pulse Gen ZX in this case may not help very much further. Should you buy a few Audio Magic Pulse Gen ZX, or just a full power line conditioner with the same money? That's something only you can decide for yourself.


Audio Magic Quantum Physic Noise Disruptor.

Big Disruptor and small Disruptor.

Here is a simple black plastic box, seemed to contained some loose bits inside. All four sides of the box is tightly seal to prevent tampering. The user manual clearly states that "Opening up of the box will result in permanent and irreversible damage" to unit. I do not know, and unable to find out, what is the "magic" ingredient in the box. So much for curiosity!

Quantum Physic Noise Disruptor placed on top the big, big tranny in the Torus Power.

The product is supposed to be placed on top the your equipment where the power supply transformer resides. When the Quantum Physic Noise Disruptor is placed, on the top panel where the transformer is, it should result in lower noise floor. I started by placing on the biggest transformer in the system which is the Torus Power, but resulted in no audible difference. I proceeded to place the Quantum Physic on my CD player and my Pass Labs X2.5 pre amp. Again, I heard no audible difference! I felt perturbed, and decided to bring the Quantum Physics to hifikaki's system for a try.


Again, when placed on top of his Shunyata Hydra 8 PLC, again we both heard no difference! When put on top of his Copland CD player, again nada, zilch, no difference heard! We proceed to place on his Pass Labs X-2.5 pre amp, I heard no difference, but hifikaki thought there was a small improvement in terms of noise floor and a fuller mid range. However, at this point, even himself became doubtful.

Placed on top of the Pass Labs X-2.5 pre amp tranny, did not hear a diference, if at all!

I then sent the Quantum Physic Noise Disruptor to a friend to play with for 3 days. His system consist of Torus Power, Marantz CD17 KI, Audio Analog Pucini integrated amplifier and Rogers LS 5/9 speakers. When I met up with him 3 days later, he ask where can he buy this Quantum Physic from? He reported when the Quantum Physic is placed on top of various equipment in his hifi chain, he heard improved focus in sound staging. Music became more precise and easy to follow. Transparency at low volumes improved too. He also noted better bass impact, transient and definition. He also reported a slight compromise in the fact that when he played music loud, he did detect some hardness setting in, and mild saturation in the musical presentation. I am in no position to prove him wrong or otherwise, as I did not get the opportunity to listen to his system at the time, but I have a lot of faith in his ears. He certainly knows what he heard.


I told Mike of Audio Creations about our perplexing findings, he reply was that, he's "not amused!". He said that he'd been warned by the manufacturer, i.e Audio Magic that "the Quantum Physic doesn't quite work with Pass Labs gear!"


But it does seem to work with other manufacturer's equipment as proven in my friend's system. I would suggest you try before you buy. There are two sizes available for the Quantum Physic Noise Disruptor. A smaller unit cost RM$285/unit and the larger unit I tried cost RM$800/unit.


Audio Magic is sold by Audio Creations. Contact Mike, tel: 012-3315669

Did David Copperfield use this before?


This is something new to me, Clearaudio calls it a magnetic damper, I'd see it more of a levitation device. It is actually pretty straight forward, if you can remember our primary school science class, you'd understand that with magnet polarities, opposites attract and if same, it repels each other. It's as simple as that! Just 2 magnets of the same polarity pushing each other away in a magnetically shielded cylinder. However, it's engineering involved is mind blowing! Otherwise, how do you keep two magnets pushing each other away, whilst maintaining free lateral movement(the sides of the top cylinder don't touch the middle outer cylinder but are somehow kept centered all the time), with height adjust ability to boot?


4 individually packed pcs is a box.


Yes, you read right, it's height adjustable. How? you simply turn the bottom extended rim clockwise or anti clock wise with one hand, while another hand holds the centre rim steady, to adjust the height of each damper. As per instructed by manual, each unit holds 8kg, my Marantz CD7 weights 23kgs. So I put one damper under each leg, with my Audio Physic supplied round spirit leveller place right in the middle of the CDP top plate, I proceed to adjust each of the 4 dampers until the spirit leveller is dead center. The process took a while, but once accustomed, can be accomplished a whole lot faster, as you'll see when I do the same with my Rega P25 turn table.


Marantz CD7 levitated, or elevated!

So the CDP is levitated, but how does it sound? In a word, fantastic! It's probably THE most effective isolation device around. It doesn't really change the sound that much, but what little it does matters so much to the music. It allows your equipment perform to it's fullest without exhorting it's own character, which by comparison, the FE Ceraballs do so to a certain extent(if over used, that is!). I can say that each musical instrument, vocal replayed via the system now has an added dimension to it. Like high hats has that brassiness to it. The piano seems more naturally real and violins have that little extra sheen to it's resonating body. Vocals have the extra body too. Best of all each and every instrument presented within the sound stage has that little bit of air around them, making them seemed free, un constricted.

Bulls eye!

Now the Marantz CD7 is normally not very receptive to tweaks, so having achieved this far really does say something about the levitation device. However, just to put everything in to perspective, The Clearaudio Magix2 doesn't change your system's tonality, doesn't make the sound stage wider of deeper. It doesn't re model the musical structure , but what it does is free up a little more harmonics from the music, making it that little bit richer and golden toned, which if you're a regular reader, will know that I favour over dead neutrality. I like my system to sound beautifully glorious, even if it's not the absolute truth.

3pcs Clear Audio Magix2 used to levitate the Rega P25 with Benz Micro Glider L2 cartridge.

Using the Magix2 with my Rega P25 turntable only required 3 pcs. Placed under the turn table in a triangular fashion, leveled with the help of the above mentioned spirit leveller. Again, when used with the Rega turn table, the music flows freer, and with all the above mentioned qualities present, albeit in smaller increments. It could be the Rega is a tad light weight for the Clearaudio Magix2. I previous had 3pcs of Finer Points cones(made of wood/resin mix with stainless steel tip) used under the Rega. In comparison, the Finer Points cones made the music sound a little lean, light weight or lacking image density, and bass doesn't seem to extend as low, also less articulate. By now, you can tell that I like the Clearaudio Magix2 very much!

Bulls eye again, boy am I a sharp shooter.

At RM$900/pc it's pretty expensive, but if you value the finer subtleties that makes music much more enjoyable, and have a pretty high end system to start with, you'd owe it to yourself, and your musical enjoyment, to check it out. I have a strange feeling it'll work very well under the Torus Power RM8A too! (Damm, .... I really shouldn't be thinking of the Torus again!)


Clearaudio sold by Audio Image, tel: 03-79563077

cerapucs replacing the 10 sen coins


what: finite elemente cerapucs

price of admission: RM1,300 for set of 4

how: positioned under the mana table as footers

wow factor: stablize the soundstage. musicians more solidly achored on the plane. increased dimensionality of images. enhanced bass bounciness.

dealer info: audio image 016-6001218

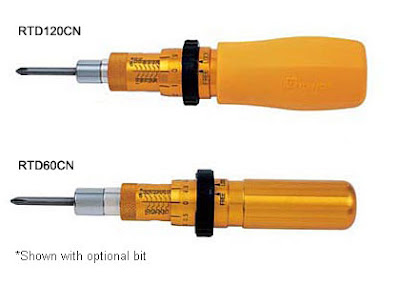
ck ngoh and i had a field day trying out with different forces (measured in kgfcm - kilogram force centimeter) on the torque driver.

we found out that every 0.2 kgfcm (the smallest increment on the driver) makes a huge difference!

the best analogy i could give is squeezing the water from a wet garment - the tighter you squeeze, more water gets squeezed out and the garment has less moisture (the more focus one gets but at the expense of the sound getting a bit more tense/dry); the less you squeeze, more moisture is retained but it is still wet (less focus but more relaxed sound).

since ck's model (26RTD) comes in 0.2 kgfcm increment, we couldnot get the golden number - 5.5 kgfcm - as recommended by telos' designer (jeff lin).

i am not perfectly happy with either 5.4 kgfcm nor 5.6 kgfcm. could 5.5 kgfcm be the magic number that jeff lin has found out thru his various experimentations?

i could only tell when he visits me this thursday.

stay tuned.... it is gonna be the torque of the town.


in all my 20+ years of hifi, i haven't seen a tweak as ground-breaking, impactful and life-changing as the torque screwdriver. .

ck had his audio physics speakers fully torque-ed and the whole desirable audio team went to listen tonight. my god, the improvement is nothing short of astounding. a 20% quantum leap in performance from just RM600 investment on the tohnichi torque screwdriver. if this is not ground-breaking, i don't know what is.

in the past, i have made several comments on ck's system which he didn't take seriously. tonight, i hope he understands what i meant.

the best part about audiophile fellowship is the sharing. nothing beats the joy of seeing your fellow audiophile achieved audio enlightenment, and being able to communicate with you. i am a very critical listener and a lot of times, my comments or constructive criticism - if i am generous enough to make them la (as most times, i just keep quiet) - were taken in the negative way.

i hope this gigantic tweak has elevated ck to another league in audiophile ladder (a ladder of endless pursuit of perfection or imperfection!). i hope with this gigantic improvement, ck would be able to share with me on a much much deeper level. like-minded sharing is the ultimate joy of this hobby that we love so much.

i was told that some veteran dealers/audiophiles knew about this tweak long ago but seldom share it with others. at desirable audio, we believe in the generosity in sharing. because as more people attain good sound, there will be more contentment. with more contentment, there will be more fellowship and sharing. with more fellowship, there will be more goodwill and positive upgrades. with more positive upgrades, the hifi economy will improve. it is a win-win-win situation for you, your friend(s) and the dealer.

heartiest congrats to you, ck gnoh.

The Ceraball Universal, with the M8 screw and jamming nut assembled(as per diagram D).

We were provided loaners to play with the last time(smart tactic Adrian!, give'em honey and they'll stick like bees). After returning the loaners, I started missing the Ceraballs effect. So I had to get some of my very own, but this time with a twist.

I managed to wrestle two sets of Ceraballs Universal from our friend GCK. I decided to use them under my pair of Audio Physic Spark speakers, which weight in at 17KGs each. Just nice for the Ceraballs.

Audio Physic Spark with the original spikes in use.

When using the Ceraballs Universal to screw under the speaker feet, do remember to use the jamming nut on theM6/M8 attachment screws provided. I tried using the Ceraballs under the Audio Physic with and without the jamming nut, and found that the Ceraballs does nothing for the sound without it. It sounded exactly the same as using the M8 spikes provided by Audio Physic. The speakers are then adjusted to balance on all four Ceraballs using a water mark level provided by Audio Physic.

Audio Physic Spark with the Ceraball Universal.

With the jamming nut in used, and the speakers put back in to their original position, the effect was like as if my system had an EQ installed, with the adjustment of a smiley curve! The bass and treble frequencies overwhelmed the mids! But that was just what I needed, I had always thought, that if I had a little more in room bass response, I could pull the speakers a little further in to the room, to better re-create stage depth, an area which my system could further improved upon.

The speakers are further pulled in to the room by 4 inches. Making them sit 36 inches away from the speaker's back wall, and 16 inches away from the side wall. With the speakers repositioned, I found the smilley EQ curve effect gone. The system now sounded very tonally even, as before, with a touch of warmness, but that mid range bloom so evident before has very much subsided. With the new speaker position, the stage depth does indeed improved, without compromising stage width, which is something that, I had to do a balancing act before. not this time. Bass also extends lower and tighter. In short, it's like I've upgraded to a bigger Audio Physic in to my room!

Nice shoes!

Since I had FE Spider like rack, I wondered if the FE Spider Ceraballs fit? Again I borrowed some from Adrian to try for fitting. To my surprise, they fit really well! Some how the rack and the Spider Ceraballs just locked in like hand in gloves.

I opted to retain the glass shelves I had and allowed them to sit in between the Ceraballs and the equipment instead of having the equipment sitting directly on top of the Ceraballs. I like the look better that way, well, hi fi can also be eye fi sometimes. With the limited lateral movement of the Ceraballs along the X beams on the Spider like rack, the glass shelves also makes equipment balancing on 4 Ceraballs easier. The whole rack was re-adjusted for even balance using the same Audio Physic provided water mark level.

As before, with the Ceraballs under the Marantz CD7, only minor effect was observed. The sound tightened up somewhat, with an overall tidier presentation. The Ceraballs did a little more when added below the Pass Labs X2.5 pre amp. It allowed music to breath a little more freely within the sound stage. Musician which sometimes appear to elbow each other now has their own playing space within the sound stage. You can say the sound stage is a little more 3D in effect. The slightly excessive highs have given way to a more mature, mellow yet airy qualities. The mids now allows the voices gain more palpability and density. The already tight bottom end now gained an elastic quality too, that makes bass guitars and double bass instrument that little more believable. Kick drums are now distinctly heard, with each kick, even when the music mix is very busy.

Ceraball Spider under CDP and Pre amp.

The biggest benefactor of the Ceraballs Spider is the Rega P25 Turntable and phono stage. With the Ceraballs underneath both equipment, the vinyl part of the system can finally catch up to the CDs. I found my self suddenly playing much, much more LPs than before.

Ceraball Spider under Turntable and Phono stage.

The final tally, I got 2 sets of Ceraballs Universal, and 4 sets of Ceraballs Spider.

Perhaps it's the way my system is flawed, kinda plays to strengths of the Ceraballs. I can't be sure, but I suppose YMMV is still a caveat that is relevant, based on ML's earlier findings with the Ceraballs.

Lastly, word leaked out to some of my hi fi buddies that I had spent a small fortune on the Ceraballs. Suddenly, I am the butt of all jokes Ceraballs.
One suggested perhaps that I should also have 4 Ceraballs under my listening chair, but with my weight, the Cerapucs would be a better option!, if only he'd pay for it.

Another even suggested that I should have a Ceraball stuffed in to my ass! Well, if it made my hi fi sound better, with out feeling the pain in the ass!, I'd certainly consider.

for someone who has little patience, i have been experimenting patiently with the FE ceraballs for the past 3 days.

i am amazed as i dwelve deeper into them. maybe i am a tweak virgin, pardon me.

first things first - the ceraballs must be used in 4 pieces to derive the full benefits, not 3 as stated by my fellow bloggers here. when 3 pieces are used, the full (positive) impact of the ceraball is largely compromised.

it is darn difficult to balance your equipment on 4 pieces; there is bound to be one single piece which is "loose" and not in tight contact with your equipment's base. when this happens, the resultant sound is again hugely compromised!

here's the trick i found out: balance the two pieces (back or front, depending on whether your equipment is front-heavy or back-heavy) using two hands simultaneously. move the two ceraballs in opposite or random directions until such point where the tips of ceraballs are into tight contact with the equipment's base. when you reach this point, you normally cannot move the ceraball anymore. stop there!

also, as astutely observed by ck gnoh in his comment in "the power of titan" post, the positioning of the ceraballs is critical. it requires minute adjust! it is really a tricky balancing act as you move the ceraballs wider or closer apart, forward or backward. the moment you get the best highs, you get less focus; the better the focus is, the less highs. you have to experiment until you get the best bass and best stereo imaging and the least compromised highs. as i have said, these are the pluses and minuses of the ceraballs.

after many trials, i managed to somehow maximize the ceraball's positive impact and minimize its negative impact. my highs are (arbitrarily) 3-5% less than what i used to get but i gained more in terms of imaging, focus and soundstaging. could the 3-5% loss be considered as excess highs/energies? i need to mull over this in the next few days.

there is still much to experiment with these balls of fire but this tweak virgin is definitely having fun!

ithe ARC sitting on the ceraballs, with the unused cerabases infront

i had reported earlier that the FE ceraballs didn't work on my mana rack. they dull the sound and curtail immediacy.

but it doesn't stop me from exploring further. i got two sets of ceraball universal from adrian wong of audio image (016-6001218) yesterday to try on my ARC monoblocks and the results are truly rewarding.

first effect, the ceraballs made the bass shape like a ball of low energy, they tidy up all the smearing of low notes. the bass now takes on a 3-D spherical "form" which is very much like the real bass notes that we are used to in real life. lovely! this is plus point number 1.

2nd effect, the ceraballs enhance soundstaging in a very unique way. the keyword here is tidiness - they tidy up all images, again reducing smearing and improve delineation; they make the images more compact and more 3-D. the images now floats within the soundstage more convincingly and palpably. also, because of this tidying act, the separation and layering of instruments and musicians are more pronounced than before. to me, this is the single most rewarding asset of the ceraball. and i must tell you this wonderful panaromic effect - all the musicians seem to play on a 3-D platform that is anchored solidly on the plane behind the speakers.

i would like to warn you that the ceraballs cannot be used to the extreme. in my case, 2 sets under my monoblocks are already the most my system can take. it has a tendency to dull the sound and reduce immediacy but in my case, because my highs/immediacy are so brilliant, i could tolerate a bit of compromise. when i tried the 5-times-more-expensive FE cerabase, the drawback could immediately be felt. the cerabases are a definite overkill for the 27kg-only monoblock, it is just not heavy enough to derive the full benefits. the resultant sound is dull and liveless.

i thoroughly enjoy this new presentation that i am getting from my RM1K investment.

the affordable finite elemente ceraballs are infinitely satisfying for these financially trying times.

[post-script]
after dabbling with it for another night, i must say the ceraball is not without its shortcomings. the way the ceraball enhances the stereo imaging and soundstaging requires a bit of compromise. it does rob my system off some high frequency brilliance that i love so much but that could be "false and excess highs", i am not quite sure. but overall, the pros overwhelm the cons. i particularly like my soundstage now, very dimensional and palpable.


when master ken recounted how little kc (my former blogger) performed this magical tweak for him over the weekend, his face was full of delirium and amazement. that itself is enough to convince me that he is up to something sinfully good.

i am torqueing, or sorry, talking about torque tools. well, there are many type of industrial torque tools for various applications but the kind we are talking about here is the torque screwdriver (picture above) to tighten up the screws - with precise torque - on your hifi (amplifiers, cdp and speakers).

this wonderful concept/tweak is advocated by taiwan telos' designer, mr. jeff lin, who subsequently taught little kc his bags of sure-fire tricks. as we know, when we tighten up the screws, the torque is always inconsistent hence the pressure applied is inconsistent as well. general physics will tell you that this will results in uneven resonance/vibrations, hence affecting the sound. but as to the degree of its negative impact (to the sound), very few people bother to find out.

i haven't tried it myself but from master ken's face (who's at most times a wise sceptic, if i shall use this description), i could believe all the fuss. his system is transformed by this simple tweak!

the good news is, telos dealer, john sin of c&o ipoh (012-5269313) has invited jeff lin to pay me a visit next month to impart some tricks to me. it is high time to torque to a sifu from taiwan! you bet i am excited about his visit!

everybody, let's torque hifi!


a lot of visitors to my house always wonder why i didn't use any tweaks. they always suggest that i should start using some to bring my system to another level. but they don't know that my biggest tweak is my mana table and mana soundframe which have been serving me very well for more than 7 years now and i swear by them.

many audiophiles, especially the younger ones (those who went into this hobby in the last 5 years) don't know about mana being a top-notch equipment support maker from UK. mana is expensive to start with and we don't have a local dealer. the funny thing about mana is that it doesn't like anything on top on it, which means to say it doesn't work well with other tweaks like cones and resonance controls.

tonight both panzer and ck witnessed how the ceraballs failed in my system. they don't work on either my preamp and cdp. the resultant sound is a taming of energy and musical flow, curtailing of air, slowing down of rhythm and compacting of images. the singer with ceraballs on sounded sedated, as if she has had a full meal and too lazy to sing, eventho' her image is more focused and sharper, the later being the only advantage. incidentally we tried a track which is full of energy, zing and PRaT and the ceraballs slowed down everything. we tried to turn the ceraballs up and down but the overall effect is still negative.

well, as i have said, my system is well balanced and it doesn't need much tweaking.

que cera cera, whatever will be, will be.


[In-Line Advertisements]